Donation Statements
You can print and/or Email Donations Statements at any time of the year. When doing so, the giving and pledging information entered in the software is calculated and printed onto a statement for each selected person or group.
For Canada Users only: Donation Statements in
Church Windows will be referred to as Donation Receipts. When
Donation Receipts, be sure to verify the starting Receipt #.
To access the Donation Statements screen:
- Click Reports / Export in the Button Bar at the top of the screen
- Click Donation Statement.
- It will open up to the
Query Builder tab:
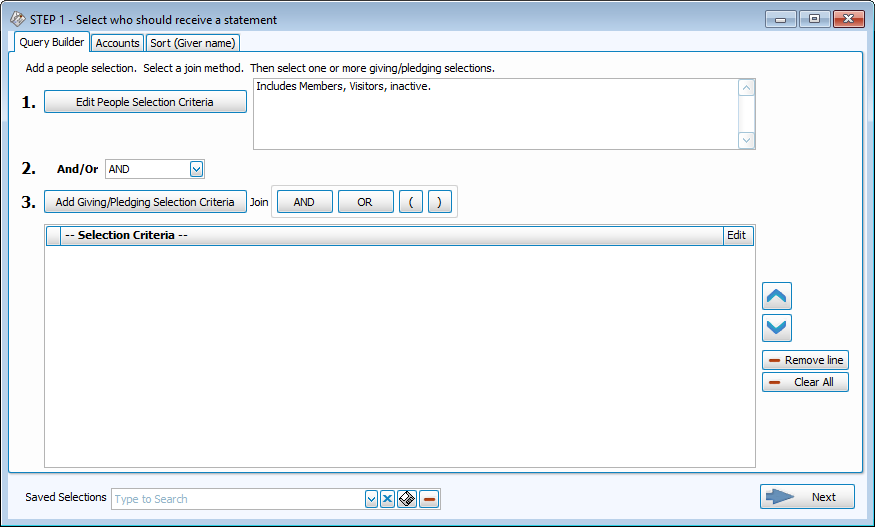
Step 1 — Select who should receive a statement
- Click on the Add Giving / Pledging Selection Criteria button, here you can change the Date Range and make any selections you want to narrow down the list of Givers receiving a statement by the giving and pledging conditions that this tab provides. If you want statements only for those who gave, you don't need to change the default selection:
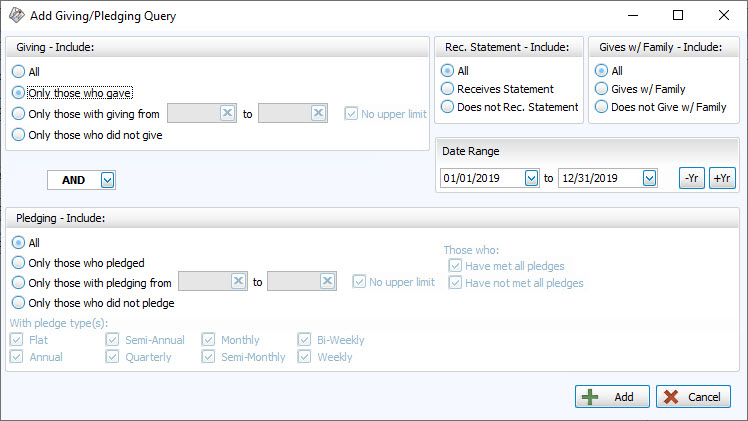
Giving — Include
Choose the option that best describes the Giving information you wish to see:
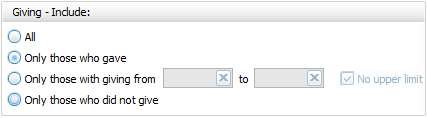
- All — Click this option to have all kinds of Givers regardless of their giving included.
- Only those with giving from — Enter a desired range of donation dollar amounts that you would like to include. If the range has no maximum amount, place a check in the No Upper Limit box.
- Only those who gave
- Only those who did not give
AND / OR
Between the Giving — Include and Pledging — Include areas of the screen, use the AND / OR dropdown box to specify how the criteria must be fulfilled:
- AND — Use to search for people who meet BOTH of the criteria, allowing less people to be included.
- OR — Use to search for people who meet EITHER of the criteria, allowing more people to be included.
Pledging — Include
Choose the option that best describes the information regarding Pledges that you wish to see on your report:
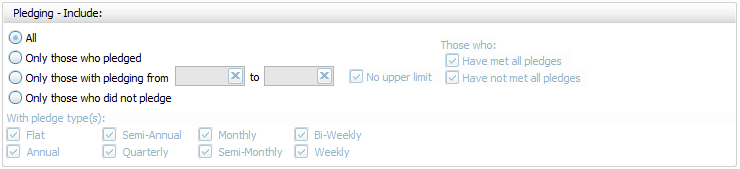
- All Givers — Includes all Givers regardless of Pledging.
- Only those with pledging from — Enter a desired range of pledge dollar amounts that you would like to include. If the range has no maximum amount, place a check in the No Upper Limit box.
- Only those who pledged
- Only those who did not pledge
- Those who:If applicable, place or remove a
 checkmark for Have Met All Pledges and/or Have Not Met All Pledges.
 - With Pledge Type(s): Place a checkmark next to any or all frequencies of pledges you want to include on the report.
Other Options
At the top right of the Giving / Pledging tab there are sometimes a few more options, these include:

- Receives Statement — specify if you only want to see those who do or only those who do not receive statements. (This is not an option on Statements as Givers without "Receives Statement" checked cannot be included)
- Giving as a Family or Giving Separately — specify if you only want to see those who give alone or only those who give as a family.
- Date Range — select the time period that you want the report to present.
- Show Giver totals — if you want to see a total for each Giver on the report.
- Summary only — if you want to see only the summary, instead of an accompanying, individualized listing by Giver.
- Choose any of the following tabs to apply additional settings:
- When you're finished, click the → Next button.
To specify certain Membership characteristics of the people you want to include. The characteristics for you to choose are actual fields that store people's information in The People File. This tab is the exact same as the People Selection Criteria in Membership Reports / Directory / Exports.
Specifies that only certain accounts should be included.
Organizes the information into the desired order (and groupings).
Step 2 — Select the statement layout / format
Make selections on each of the tabs to customize your statements, as needed.
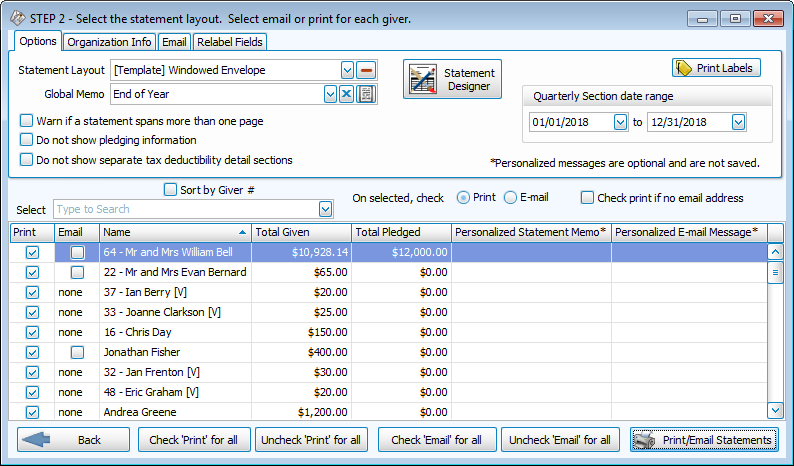
Options
- Statement Layout and Statement Designer
Choose the desired Statement Layout from the dropdown or click the
Donation Statement Designer button to modify an existing layout or to create your own.
dropdown or click the
Donation Statement Designer button to modify an existing layout or to create your own.
- Global Memo
Enter a new message or select a previously entered one from the dropdown if you would like to include a message to all of your Givers on their Statements. (Alternatively, you can use the Personalized Statement Memo* to include a personal message for one specific Giver.) - Warn if a statement spans more than one page
Place a check in this box to turn on the notification for statements that exceed a single page or remove the checkmark to avoid being notified. - Do not showing pledging information
If your Church does not use the pledging portion of Donations, you can remove all pledging information from statements by checking this box. Leave the box unchecked to include pledging information on statements. - Do not show separate tax deductibility detain sections
In the detail section of your statements, you can check this box to prevent it from separating donations based on the tax deductible status of the account. - Print Labels
Once you have selected the names of the Givers to whom you want to send a statement, you can send a label to the same selected Givers by clicking the button at the top right. This way, you can print Labels for the same Givers receiving a statement. - Quarterly Section date range
If you are using a statement layout which will include the Quarterly section, verify that the date rage of the desired Quarter is showing in this box. If you are unsure if your statement layout includes this section, check the Donation Statement Designer. - On selected, check
Here you can choose either Print or Email - Check Print if no email address
Have a statement printed out for email addresses that are not on file by placing a checkmark the box. This way if you choose, Email and the statement recipient does not have an email on record, the software will know to print out a statement.
 - Select the Givers for the statements you need by placing a checkmark next to the desired names under the Print or Email column.
- For either column, you can also click Uncheck 'Print' (or 'Email') for all to remove all check marks, manually select certain ones, or click Check 'Print' (or 'Email') for all to reselect all names in the list.
- Click Print / Email Statements to proceed to a
Print Preview. If you have chosen to email statements, an email will be sent with an attachment of the statement in PDF file format (see below).
Note:
If a Giver who should receive a statement is missing from the list of selected Givers in the bottom half of the screen, you must place a  checkmark in this box on the selected Giver's record in
Manage Givers to include them. If there is no checkmark in the Receives Statement box for a Giver, the software cannot print a statement for that Giver.
checkmark in this box on the selected Giver's record in
Manage Givers to include them. If there is no checkmark in the Receives Statement box for a Giver, the software cannot print a statement for that Giver.
Organization Info tab
Unless otherwise specified, your Church name will appear at the top of the report as you initially entered it into the Organization Info stored in System Information in the Administration area of Church Windows.
If you need to create additional sets of Organization Information, click the  Add button. Or, select an existing name from the Org. Info box and click either
  Edit to change it or
  Delete to remove it from the list.
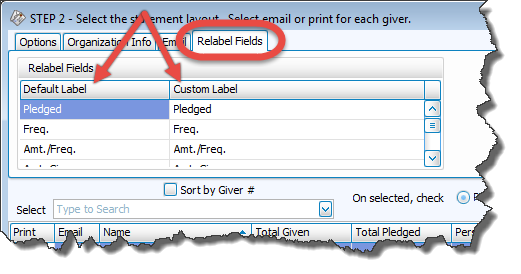
Relabel Fields tab
- When someone makes a commitment to give a certain amount of money, the software regards the money as being pledged. Some
Churches use a different word instead of “pledged”. This and other labels that appear on the statement can be changed to any words you wish your statement to show, by placing a Custom Label next to the Default Label:
Email tab
Use the Email tab to make your selections for emailing statements, first you must
Setup Email.

When you email Donation Statements, a PDF version of the same statements that you would otherwise be printing will be attached to the email. You can add other attachments and customize the email itself using the options on this tab:
- Email Setting
The names found in the dropdown box represents SMTP Email settings that have been already saved under a specific name, called the Display Name. The Display Name you choose from this list will then send your statements by email according to the settings saved to it.- To
Setup Email, click the Add button.
- To change the email settings of any existing settings in the list, click the name once. Then, click the Edit button.
- To remove a setting, select it from the list and click the Delete button.
- To
Setup Email, click the
- Global Email Message
Create or select a previously used memo if you would like to include a message to your Givers on their Statements. You may also add attachments to the email, as needed. - Email Sample Donation Statement
When finished, you can click this button to send a test email to verify that the Display Name under the Email Settings has been correctly configured. - Set Default Email for Givers
If you wish to change the Mass Assign Email Field (from MembershipModule) selection on the Donations Settings screen. - View Sent Email Logs
If you need to view records of your previous emails, click this button and choose the date of the mailing you wish to view. - Additional Attachments / Add Attachment
This box will list any attachments you have chosen to include with your statements by clicking the Add Attachment button and browsing to select your desired file.